Tag Archives: 2013 Annual

Updates on the 2013 Annual of N8816R

Cruise Flight Happiness

Cleaning the fuel injectors Friday morning helped with the #5 cylinder acting funny with lower fuel pressure (due to lower fuel flow rates). Yesterday I went on another short test flight to verify everything with the engine was ok (which it was). So today I went for a longer flight to have some fun and test out the rest of the work we did this year. Good news: it all worked well.

There was one last adjustment that needed to be made on the engine monitor, adjusting the percent power indicator to match the engine configuration. Which was only difficult because the power tables for the Bellanca don’t give a lot of altitude choices for 70% power settings which are above the ground in central New Mexico.

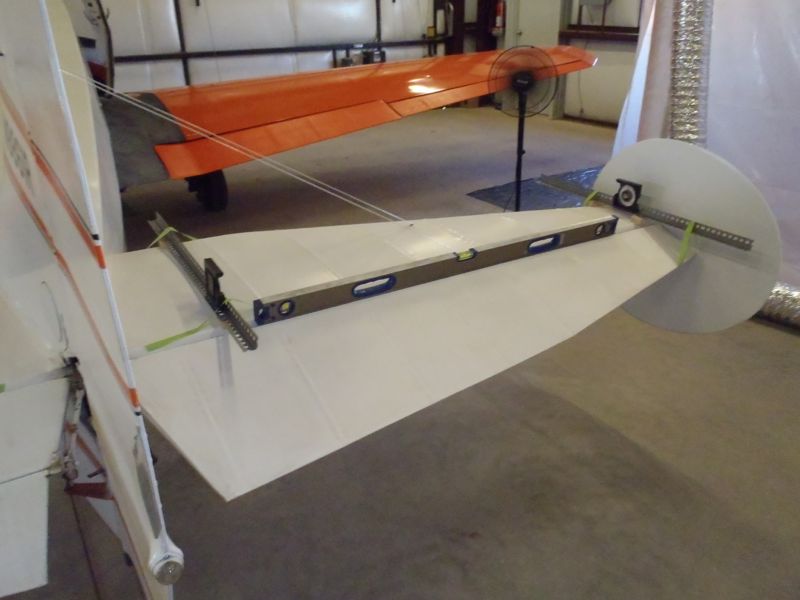
In theory, adjusting all the tail surfaces to be rigged properly should have lowered the drag and increased the cruise speed. To test that theory, I did a speed test as well. At 9,500′, 65F, full throttle, 2300 RPM, and mixture leaned to peak, I saw 145 knots at 11 GPH. Which is about 5 knots faster than it used to be, so I’m happy with that result. I could get it down to about 10.5 GPH without losing more than a knot or two and the CHTs all stayed under 350 F in cruise, so that’s happy. The GAMI spread (difference in fuel flow between the first and last cylinder to reach peak EGT) was about 0.7 GPH, which is great for unbalanced fuel injectors. With GAMIjectors, I can probably squeeze another .2 GPH out of that and run a little bit leaner in long cruise. But 13 NMPG / 15 MPG isn’t too horrible for a 53 year old airplane.

I’m having way too much fun looking at all the data that can be downloaded from the engine monitor. Thus far, everything in the data looks really good, no obvious problems lurking. Unfortunately, the data analysis program that JPI ships is Windows only and kind of sucks. I found some fairly detailed documentation by someone who had reverse engineered the data format, so I’m thinking about writing a program to do some of the more detailed analysis for me. My GUI programming skills are lacking, so that might not be a good idea, but we’ll see.

After dealing with the fuel injectors, I also paid the bill for the airplane (right about where I expected it to be) and grabbed the log books. It’s amazing how much paperwork an airplane can generate in one year, and this was a relatively simple year. So the 2013 upgrade / annual is over. Next year’s annual should be significantly shorter, as the upgrades planned are way less ambitious: replace the starter, upgrade the generator to an alternator, and (probably) install GAMIjectors. The current starter is about 18 pounds and is starting to show its age. The SkyTec C12ST3 I’ll probably install is 7 pounds, will spin the motor faster, and draw less power (which is good, because the battery is in the tail, 20 feet from the starter). The generator’s 16 pounds, only puts out 35 Amps, and the regulator is a mechanical dinosaur, adjusted by bending a spring tab. The Plane Power alternator conversion only weighs 10 pounds, can produce 70 Amps (at lower engine RPM, so no more low amp warnings during taxi), and has a modern, solid state regulator. Finally, the GAMIjectors are just about lowering fuel burn in cruise. The generator might happen before the annual, because my generator regulator is starting to act up and there’s no point in putting more money into it.

Flight!

After fixing a last minute fuel leak on the 4th (which somehow was missed during 3 other run-ups), the Bellanca finally went for a flight on Sunday. Finally! In general, things look really good. The airplane generally flew straight and level, although it still wants to drop the right wing a little bit. When I had the plane leveled, I forgot to check that the inclinometer (ie, the ball) was centered, so I need to do that to make sure the ball is set right in flight. Then some tail rigging will be in my future.

The EDM generally performed well, although the manifold pressure reading is a bit skittish. I talked to JPI today and they say that’s a common problem with the 900 series and that there are a couple of fixes we can try. I also am having some problems with the #5 cylinder. When I’m leaning, it just cuts out entirely right around peak EGT. It shouldn’t do that and hopefully is just a dirty fuel injector (which I’ll clean on Friday). Other options are spark plugs (unlikely, since it cuts off entirely, which would suggest two plugs went bad at the same time, which would be really unlucky.

Jeff took this picture of me on a (slightly high) final to 27 after the flight. Almost looks like I know what I’m doing…

IMG_4769 - Comin in for a landing

No more painting!

The flying wires are now painted, ending the marathon of painting this year. I hate spraying enamel, largely because I suck at it. This time didn’t turn out too badly. No runs, but it’s not quite as smooth a coat as I’d like. Definitely better than it was and hopefully properly priming the flying wires will cause the enamel to actually, you know, stick this time.

I need to do a full power run-up to make sure that the fuel pressure is still adjusted properly (adding the fuel flow could theoretically reduce flow) and also adjust the generator output. Now that I have a voltmeter, I can see that the generator’s been setup a bit hot, which isn’t great for the battery. Hopefully won’t take too long, then it’s time to fly!

Primed (but not ready)…

This morning was cool enough to prime the flying wires, so now I just have to wait the 48 hours (ish) for the epoxy primer to cure and I can paint the flying wires. I must be getting better at spraying, because I managed to avoid the runs I had when I was painting some of the exterior parts for the EDM. There’s not much prep between the primer and the enamel paint, so I should be able to paint Tuesday or Wednesday night. Assuming John concurs, I should be able to go flying on the 4th :).

Straight and true?

Last weekend, I finished adjusting the flying wires and the tail feathers should now be straight and true. John inspected everything on Friday, which meant I could do the fabric repairs and paint.  Unfortunately, I let John convince me that I should repaint the flying wires while the plane’s down, so I also stripped the flying wires.  The paint won’t cure for 12 hours, so I need to wait until tomorrow morning before I can mask off the repaired sections to prime the flying wires. Tomorrow I should be able to prime the flying wires and then I can paint on the 4th.

OLYMPUS DIGITAL CAMERA

John and I had done a run-up two weeks ago and most everything looked good, although we noticed the heater muff on the exhaust was really close to the lower cowl. A new support clamp and some adjustments to the muffler and there’s more clearance now. I’m still going to have to watch it for the first couple hours, but I’m pretty happy with how it turned out. I also swung the gear with the cowl installed today and found a place where the gear rubbed on the cowl; a bit of work with the Dremel and it all looks good.

OLYMPUS DIGITAL CAMERA

The todo list before flight is pretty short: tighten the bands around the firesleeve on the fuel flow sensor and painting the flying wires. There’s a bunch of adjustments that I’ll need to make to the EDM-900 before it’s ready for a cross-country flight, but I need to make a couple short test flights first so that I can take up a safety pilot while I’m doing the adjustments.

Annual Completed

Well, the annual inspection is basically done.  There were a couple of surprises this year, including magneto filters that crapped out and needed to be replaced and the need to replace all the flexible engine hoses.  But all in all, a lot of progress was made:

  • Replaced all the old analog engine instruments with a JPI EDM-900 electronic engine monitor
  • Recovered the flaps and ailerons
  • Replaced all the old circuit breakers with Klixon pullable breakers
  • Overhauled the hydraulic powerpack (control unit)
  • Replaced all the flexible engine hoses (oil, fuel, and hydraulic)
  • Adjusted the routing of the propeller adjustment cable so that it’s much smoother
  • Replaced the battery (yet another thing I was hoping I wouldn’t have to do)
  • Rebuilt the lower engine cowling fiberglass, which was falling apart

While we had the airplane leveled on jacks to calibrate the fuel senders for the EDM-900, we noticed that the horizontal and vertical stabilizers weren’t square, as they’re supposed to be.  The stabilizers are rigged based on flying wires (tie rods) connected between the fuselage, horizontal stabilizers, and vertical stabilizer and were clearly misadjusted.  It’s lots of measuring, adjusting, and measuring again, but I”m starting to work towards square.

OLYMPUS DIGITAL CAMERAThe adjustments suck more than it might appear because the top flying wires can only be adjusted by nuts which are covered by fabric.  So the fabric in the vertical stabilizer has to be cut (and later repaired) in order to make the adjustments.  I’m hoping that once everything is properly rigged the plane will be a bit faster.  And more importantly, won’t require the big, ugly trim tabs in the ailerons to keep the plane flying straight.

There’s a couple other small issues I need to resolve: the voltage regulator seems to be adjusted a bit high and the exhaust stack is slightly rubbing on the lower cowling and needs to be adjusted.

Fabric Work Done

Despite the lack of updates, there’s good progress on the airplane over the last couple of weeks. In mid-May, the airplane went over to AirTec for the annual inspection.  Nothing major was found, but there were a couple of smaller issues that I need to sort out before she flies again.

Before the annual inspection, I had to finish the flaps and ailerons.  When I last posted, I had finished taping the surfaces and it was time to paint.  There’s 8 coats of paint on the fabric: 3 coats of PolyBrush (the pink stuff, which is basically liquid vinyl), 3 coats of PolySpray (aluminum in suspension, provides a UV protection), and 2 coats of PolyTone (the color coat).  All the coats are sprayed on, which is a bit of fun, as it requires an air compressor, an HVLP spray gun, and some type of paint booth.

When I started the project, I had a 30 Gallon oiled air compressor, which is good, but just barely able to keep up with a small HVLP gun.  A neighbor was moving and gave me a great deal on his 80 gallon compressor, which can sustain much higher air output.  It’s also huge and requires a hard wired 15A/220V connection.

OLYMPUS DIGITAL CAMERAI forgot to take pictures of the PolyBrush and PolyTone coats, but here’s the control surfaces after the first coat of PolySpray is applied:

OLYMPUS DIGITAL CAMERAThe spray booth is 8’x8’x20′ and will be used to spray Jeff’s KitFox now that I’m done, so all the work of setting it up won’t go to waste.  You can see that the first coat is still a little thin, but that’s why there’s two more coats after.  By the time it’s done, there’s a solid UV block without much weight.

After replacing all the bushings in the control surfaces and their mounting points, they were reinstalled during the annual.  It was a bit tricky to get the ailerons on; the new bushings made everything really tight.  But they’re all on and there’s a lot less play in the controls now.  I’m pretty happy with how things turned out.  But I’m also not looking forward to recovering the rest of the airplane :).

OLYMPUS DIGITAL CAMERA OLYMPUS DIGITAL CAMERA

Taped

This weekend I managed to finish taping the flaps and ailerons, moving one step closer to flying again.  Any pressure point on the fabric (such as where the fabric goes from having structure under it to where it doesn’t or the rib stitching) is covered in a reinforcing tape.  The reinforcing tape is just lightweight fabric that is cut into 2-4″ strips, with pinked (little triangles) cut to promote adhesion.  Next step is to add one last brush coat of PolyBrush (the pink stuff) on the fabric to add more “glue” between the tapes and base fabric and then iron all the tape edges to make sure the edges are bathed in the vinyl left by the PolyBrush and likely to stick.  Then the spray coats begin!

OLYMPUS DIGITAL CAMERA

Rib stitching

The rib stitching process started today.  Jeff came over and helped with measuring and hole punching.  I then spent the evening rib stitching the flaps.  Since the fingers still work, the ailerons are probably on the agenda for tomorrow.

OLYMPUS DIGITAL CAMERAYesterday, I painted the autopilot panel and the blank panel where the autopilot used to sit and today I painted the back of the label plexiglass for the light switched.  The paint isn’t quite dry on the plexiglass yet, but everything else is reinstalled.

OLYMPUS DIGITAL CAMERA


Poly-Brushed

The flaps and ailerons are both heat shrunk and polybrushed.  The ailerons were pretty straight-forward, since they’re relatively squared off.  The flaps, on the other hand, have a bend on the inside edge that took some effort to get to work correctly.  The ribs are thin enough that getting the glue to stick through the first round of shrinking was difficult.  Next up, rib stitching.

OLYMPUS DIGITAL CAMERA