Tag Archives: N8861R

Look Ma, No Gyros

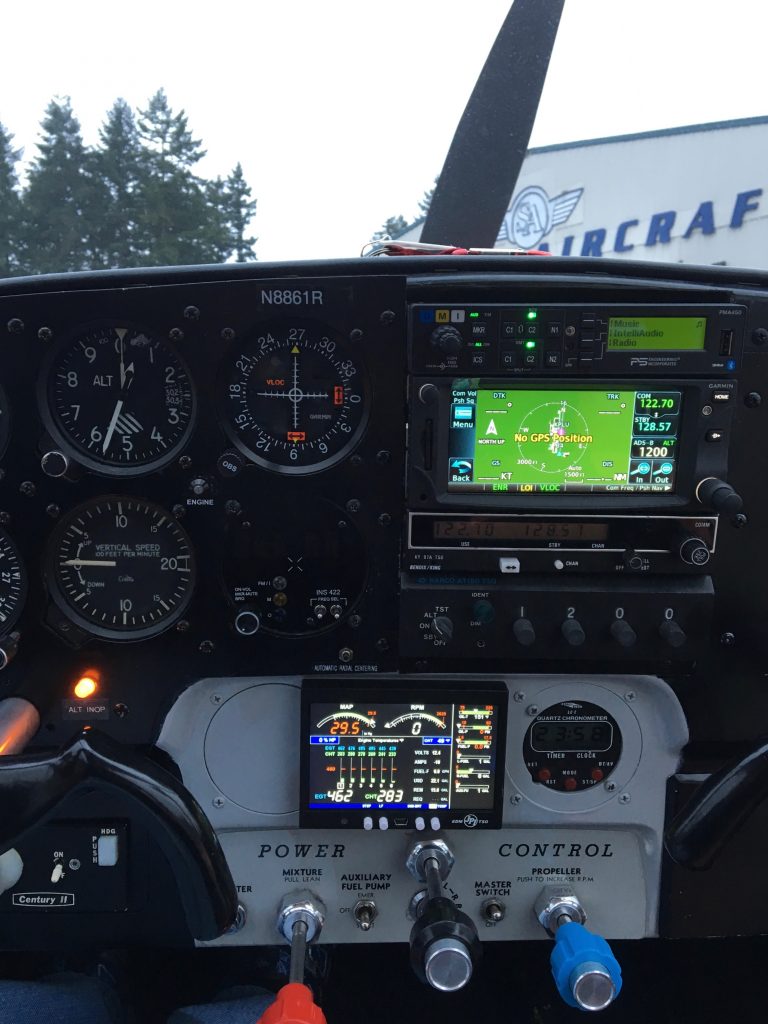
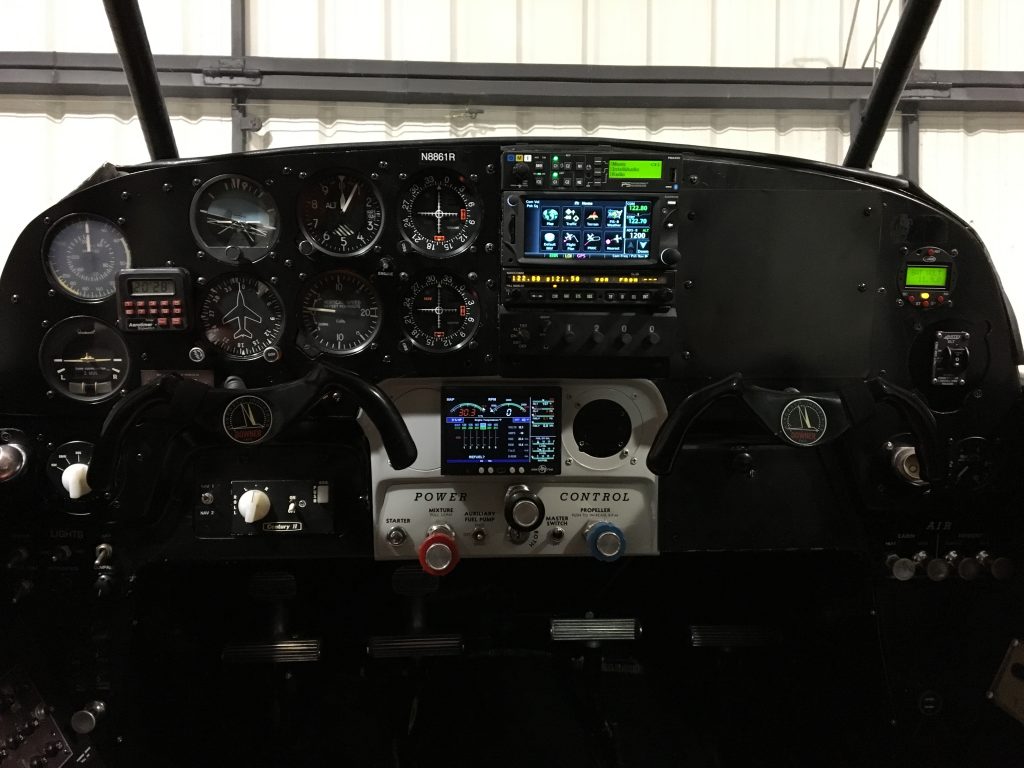
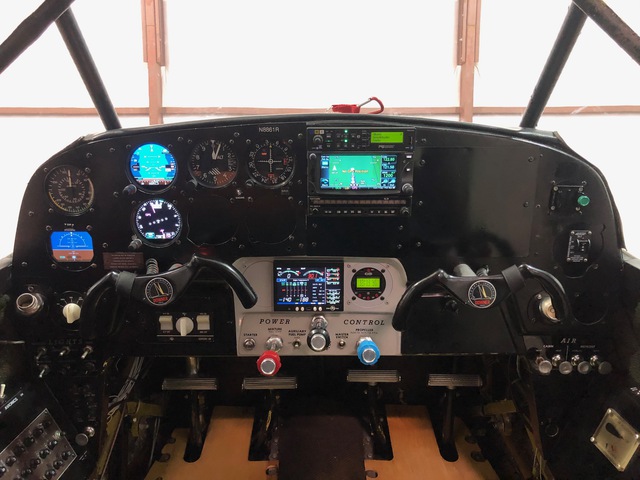
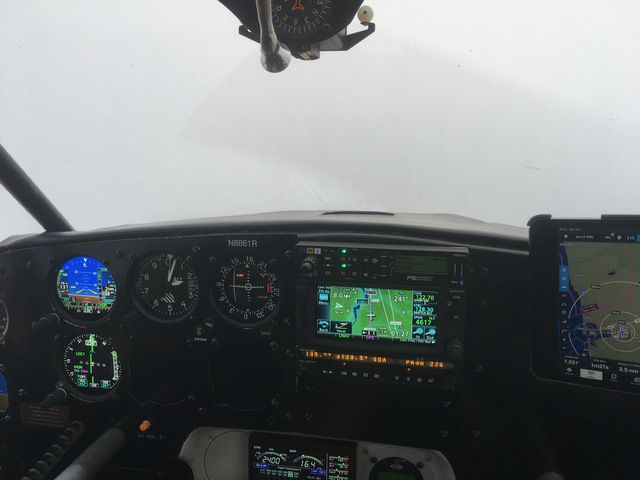
This spring, we installed two GI-275 Electronic Flight Instruments in the Bellanca, replacing the vacuum-powered attitude indicator, the vacuum-powered directional gyro, and the GTN-650’s CDI. The GI-275 is round, steam-gauge form factor electronic flight instrument that can present attitude indicator, horizontal situation indicator, course deviation indicator, moving map, or engine instrumentation pages, depending on how it is installed and used. Importantly, unlike the cheaper G5 Electronic Flight Instrument, the GI-275 can provide attitude source data for the Century IIb autopilot that is installed in the Bellanca, so I was able to remove the vacuum attitude indicator. While I could have removed the altimeter, airspeed, and backup attitude indicator, I chose to leave them for now, to have an extra level of redundancy. I did remove the vertical speed indicator, both because it is not really needed in an emergency situation and because the existing VSI desperately needed to be overhauled. The new panel configuration is pictured below (taken during annual, so the kick panels and carpet are not installed):

The HSI can display GPS or VOR/LOC input from the GTN 650 or VOR/LOC input from the SL30, including bearing pointers from any of the three sources. Because both 275s replaced primary instruments, they can only present a subset of the pages that the 275 generally supports. The top 275 can only display the ADI page (although that includes CDI indicators) and the bottom 275 can only display the ADI, HSI, and “HSI Map” page.

The big win in all the updates is that I no longer need a vacuum system. The vacuum pump, regulator, filter, pressure gauge, and hoses all came out, saving 7 lbs. I’ve had 3 gyro failures in 12 years, and dry vacuum pumps are notorious for total failure without warning, so the increase in reliability should be a real win.

Functionality Gained

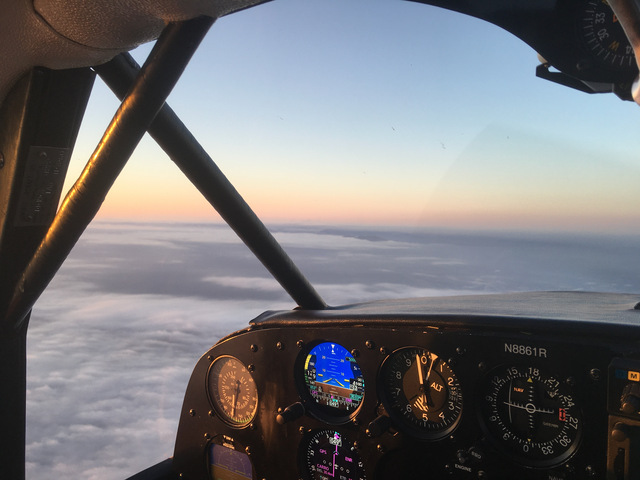
The biggest functional gain is the switch from DG + CDI to an HSI, which presents two instrument’s worth of information in one instrument. The ADI can display airspeed, altitude, heading, and navigation deviation, which means that it can be the sole instrument needed for navigation in instrument conditions, meaning that there’s less of an instrument scan and more of an instrument focus point. The altitude and (optionally, although I don’t have it turned on) airspeed bugs are nice for quickly checking whether or not you are pointed in the right direction. Of course, I could have gotten some of this functionality replacing the DG and CDI with a vacuum HSI.

The biggest gain in functionality is the integration between the 275s and the GTN650. The 275s provide heading and baro-corrected altitude to the 650, so that it can auto-sequence heading and altitude waypoints, which are common on departure and missed approach procedures. The HSI page displays next waypoint and distance to next waypoint information, which saves space on the 650 from displaying those fields. Finally, the 275 acts as a GPS Steering driver for the Century IIb autopilot. GPS Steering (GPSS) allows the GPS to compute smooth turns to intercept new courses, based on airspeed and winds, with significantly less wandering and overshooting of sharp turns that the traditional nav input. Modern autopilots can take GPSS inputs directly from the GPS, but for older autopilots, the solution is to have an emulator box (or the 275 in this case) drive heading inputs.

Complaints

There are a couple of things I don’t like about the 275s. There’s an altitude trend indicator (where you will be in 30 seconds) and a numerical vertical speed indicator, but, unlike the larger Garmin electronic flight instruments, there is no visual vertical speed indicator. I didn’t think I would miss it and, most of the time, I don’t. However, on a recent VOR approach, it really would have been nice to have a visual VSI. When there’s glide slope information available (like a precision approach or when the 650 can generate a descent profile), it is not a huge problem, but in the situations where the 650 cannot generate an descent profile (either too steep of an approach or a VOR approach from FAF to MAP), then it is a bit of a pain.

The switch between GPSS and Heading mode for driving the autopilot is three levels deep in the menu system on the 275. In an approach environment, it is pretty common to have to switch between vectors (ie, heading mode) and own navigation (ie, gpss) fairly quickly. Garmin’s latest software version has apparently fixed this and enabled an external switch, which makes for very rapid and positive switching between the two modes.

I’ve run into trouble activating the synthetic vision functionality on the ADI (a $500 add-on). The synthetic vision itself doesn’t seem all that useful, based on the 10 hour free trial. However, the flight path marker feature is really nice for maintaining level flight in IFR, and the traffic display for converging targets is nice as well. Apparently, my problems are not unique and Garmin has been working with me to fix the issue. The next step is yet another trip to the local Garmin dealer, but at least this time, it appears it will be on Garmin’s dime.

Redundancy / Regrets

I do have a couple of regrets on how the avionics shop and I agreed to do the installation. I chose not to install the temperature probe, the panel-mount USB port, or the VFR backup GPS antenna. I should have installed all three (although I lucked out a bit on the USB ports). Because I retained the airspeed, altimeter, and backup AI, the system was not required to have a revisionary switch, which I probably should have just had them install, to future proof the installation by allowing me to remove the remaining steam gauges.

Garmin’s high speed data bus (HSDB) connectivity is used to connect the 275s and the GTN650 GPS. Despite the 650 having plenty of HSDB ports, the 275 installation manual requires that the 650 connect to the ADI and then the ADI connect to the HSI. This means if the ADI completely fails, then the HSI unit does not have connectivity to a GPS source. The magnetometer also has to be wired to the ADI, due to some issue with the autopilot integration (this was the source of many calls between the shop and Garmin), because logical thought suggests the magnetometer should be hooked up to the HSI and the manual is very unclear on the point), which means that if the ADI completely fails, the HSI unit also does not have heading indication. It does have an internal ADAHRS unit, so I’ll know which way is up, how high I am, and how fast I’m going, but I won’t know which way I’m going. The best solution appears to be connecting the glare-shield VFR-only WAAS GPS antenna to the HSI unit. Then, if the ADI unit fails, I will still lose connectivity between the GTN650 and the HSI and still lose the magnetometer, but the HSI unit will be able to build its own ground track, which is good enough in an emergency. If the HSI completely fails, the ADI can still talk to the GTN650 and display course deviation indicators and heading, so I’m good there as well.

The temperature probe is optional in my install, because the existing RC Allen RCA2610 attitude indicator includes a rate of turn indicator. But to remove the 2610, I would have to add the temperature probe so that the 275 can generate standard rate of turn indicators on the ADI. The only real challenge is finding a mounting location that is in the approved lightening zone, not in the sun when in level flight, and not in the exhaust stream. It looks like the wing inspection cover to inspect the rear spar attach bolts might be the best option. Not a huge hurry, but probably would have been simpler to have this done at the start.

Finally, the panel-mount USB charger ports do not add any features, but, in addition to providing USB device power from ship’s power, they provide a USB data port to the GI-275. Rather than having to blindly reach behind the panel to find the USB port for database upgrades, I could plug a USB drive into the panel mount port and be good to go. At some point, I will have the cigarette lighter replaced with the USB port, if nothing else, to remove the cigarette lighter.

Conclusions

Despite the little complaints, I’m really happy with the improvements for flying IFR. The 275s are definitely more complex than the vacuum instruments they replaced, but the improvement in flying in IFR conditions is incredible. The altitude bug (with audible deviation beeps), minimums callout, and the greatly simplified scan all make flying IFR more enjoyable. With a couple of software improvements in the works, I think I’m going to be even happier with the panel upgrades. I do wish that Garmin would add support for flight plan transfer between the 275’s Connext bluetooth interface and the GTN650. If that existed, I could remove the FlightStream 210 and have one fewer box in the airplane.

While the shop was installing the flight instruments, I also had them replace the Narco AT-150 transponder and the GDL-88 ADS-b in/out boxes with the Garmin GTX345r remote ADS-b transponder. In addition to allowing me to gain some useful load and remove the 18,000′ altitude restriction, it also frees up some much needed panel space, as the 345r is controlled by the GTN650 display.

So that happened…

In the fall of 2015, I made some avionics upgrades to the Bellanca. The Narco Mk12D Nav/Com (and its indicator), Collins AMR350 audio panel, Sigtronics intercom, and 121.5 MHz ELT were removed. In their place, we installed a Garmin GTN650 Nav/Com/GPS, Garmin GI-106A indicator, PS Engineering PMA450 audio panel, Garmin GDL88 ADS-b unit, and AmeriKing 406 MHz ELT. After all the upgrades, the panel looked pretty good.

We flew the plane a couple times after the install, and it worked great. The day after Thanksgiving 2015, I flew down to the avionics shop to have the GDL-88’s software updated to the latest release. That part all went well. On the way home, I was a bit rushed due to some time constraints and then got into a busy pattern (no problem) with helicopters in the pattern. There was a coyote on the runway and I had to go around (again, no problem), but got behind a helicopter in the pattern and somehow didn’t get the gear down before landing (big problem!). The result was ugly.

Later investigation during repair would find that the gear alarm had been disabled during the avionics install, so the backup to the human had failed. No excuse, but irritating when I discovered what had happened. I was left with a choice: take the insurance payout and write the plane off or do most of the repair labor myself (overseen by a friendly IA, of course). I went for the repair option, which took all of 2016. The structural damage was actually pretty minimal. The inner two ribs of both flaps needed to be repaired and the trailing edge replaced, then the flaps were recovered. Minor repairs to the right wing’s 2nd rib were required. The strobe mounting bracket on the belly was removed (due to damage) and replaced with a stringer, then the fabric damage repaired. The nose gear had to be disassembled, inspected, repaired, and reinstalled. The engine went to Western Skyways for a major overhaul and is nice and shiny and clean now. The prop governor was overhauled and the prop replaced. The nav lights and belly strobe were replaced with AeroLED nav/strobe kits and the landing/taxi lights replaced with Whelen Parmetheus Plus lights. I replaced all the seat belts and added BAS inertia reel shoulder harnesses for the front seats. And, because I hadn’t changed enough things, pulled the VAL INS-422 Nav radio and King KY-97A Com radio and installed a Garmin SL-30 Nav/Com and another GI-106A indicator. Also removed the clock and installed a Guardian Aero 553 carbon monoxide detector. And, in proof that AmeriKing really was making crap, the almost new ELT didn’t pass inspection, so I pulled it and installed a Artex ELT 1000 unit.

First flight was January 5, 2017 and lasted about 1.25 hours. The airplane performed almost perfectly. The avionics upgrades all worked perfectly, as did the lights, gear, flaps, and such. Despite the flap rebuild and re-rigging both the flaps and ailerons, the airplane flew straight and level. Only two real problems during the flight: the need to turn up the prop governor to get some more RPMs at full power and a flaky left magneto. The mag has been pulled, sent to Western Skyways, repaired, and returned. Now time for propeller adjustments and a spring of hard flying to finish the engine break-in.

New Years Flight

Jess and I were planning on flying to The Hub at Tacoma Narrows for the Pacific Northwest Flying web board’s West Side Fly-In.  Sadly, we were a bit late getting going, but the weather was beautiful so we went flying anyway.  We’re in a streak of multiple very cold days with almost no wind, and there was definitely some haze in the air from all the fires.  But the air was still and cold, and you really can’t beat a -2000′ density altitude at takeoff.

We flew up the west side of Seattle, just outside SeaTac and Boeing airspace, then cut across Seattle to the east just north of the Space Needle then across Lake Union, along the canal, and over Lake Washington.  We did a stop-n-go at Paine Field up north, then Renton (sadly landing to the north, so no over water approach) and then back to Auburn.  All told, 1.7 hours and three landings.  Not a bad way to start the new year.  Jess took this great picture of downtown on our way to Lake Union.FOTD80A

Starter Swapped

The new starter arrived yesterday and was installed today. The plane’s now 11 pounds lighter and, more importantly, starts. As you can see, it’s quite a bit smaller than the original starter.

IMG_0298

Landing on Route 66

Ed, Teri, and I flew out to Santa Rosa for breakfast as a flight of two this morning. Their Cessna’s a little slower than the Bellanca, but I could stay in trail and keep the engine in the green, so still a fun flight. And I was able to run about 16-17 NM/gallon, which is a nice benefit of pulling the power back.

Santa Rosa’s 8/26 east/west runway is a mile of asphalt which used to be Route 66 (before I-40 replaced 66). So, of course, we decided to land on 26. 8/26 isn’t the primary runway and they’re apparently not spraying weed killer on it, so it wasn’t in great shape. But I can now say I’ve landed on old Route 66, which is pretty entertaining. We decided to take off on the much smoother 19, so I can’t say I’ve taken off on Rt 66.

While the airplane flew great, it’s time to replace the starter. I was planning on replacing the starter and generator next spring, since there’s no evidence either have ever been overhauled and are big, heavy, ancient things. The starter in particular has been slow in spinning the motor from time to time. The last couple of starts it hasn’t wanted to spin the engine first time the starter is engaged. Wait 5 seconds, hit the starter again, and it’s all good. This morning at Santa Rosa, it didn’t want to spin it at all. The relay engaged, but the starter didn’t spin the prop (Ed thinks I have a spot in the windings that’s shorting, so there’s a dead spot in the motor). Moving the prop by hand to the start of the next cylinder’s compression stroke seemed to get things started, but still not fun. Rather than try to overhaul the starter, I ordered a SkyTec C12ST3 starter from Spruce this afternoon. It’s a pretty quick swap (the paperwork may take longer than the hardware swap), so should be flying by next weekend.

Cruise Flight Happiness

Cleaning the fuel injectors Friday morning helped with the #5 cylinder acting funny with lower fuel pressure (due to lower fuel flow rates). Yesterday I went on another short test flight to verify everything with the engine was ok (which it was). So today I went for a longer flight to have some fun and test out the rest of the work we did this year. Good news: it all worked well.

There was one last adjustment that needed to be made on the engine monitor, adjusting the percent power indicator to match the engine configuration. Which was only difficult because the power tables for the Bellanca don’t give a lot of altitude choices for 70% power settings which are above the ground in central New Mexico.

In theory, adjusting all the tail surfaces to be rigged properly should have lowered the drag and increased the cruise speed. To test that theory, I did a speed test as well. At 9,500′, 65F, full throttle, 2300 RPM, and mixture leaned to peak, I saw 145 knots at 11 GPH. Which is about 5 knots faster than it used to be, so I’m happy with that result. I could get it down to about 10.5 GPH without losing more than a knot or two and the CHTs all stayed under 350 F in cruise, so that’s happy. The GAMI spread (difference in fuel flow between the first and last cylinder to reach peak EGT) was about 0.7 GPH, which is great for unbalanced fuel injectors. With GAMIjectors, I can probably squeeze another .2 GPH out of that and run a little bit leaner in long cruise. But 13 NMPG / 15 MPG isn’t too horrible for a 53 year old airplane.

I’m having way too much fun looking at all the data that can be downloaded from the engine monitor. Thus far, everything in the data looks really good, no obvious problems lurking. Unfortunately, the data analysis program that JPI ships is Windows only and kind of sucks. I found some fairly detailed documentation by someone who had reverse engineered the data format, so I’m thinking about writing a program to do some of the more detailed analysis for me. My GUI programming skills are lacking, so that might not be a good idea, but we’ll see.

After dealing with the fuel injectors, I also paid the bill for the airplane (right about where I expected it to be) and grabbed the log books. It’s amazing how much paperwork an airplane can generate in one year, and this was a relatively simple year. So the 2013 upgrade / annual is over. Next year’s annual should be significantly shorter, as the upgrades planned are way less ambitious: replace the starter, upgrade the generator to an alternator, and (probably) install GAMIjectors. The current starter is about 18 pounds and is starting to show its age. The SkyTec C12ST3 I’ll probably install is 7 pounds, will spin the motor faster, and draw less power (which is good, because the battery is in the tail, 20 feet from the starter). The generator’s 16 pounds, only puts out 35 Amps, and the regulator is a mechanical dinosaur, adjusted by bending a spring tab. The Plane Power alternator conversion only weighs 10 pounds, can produce 70 Amps (at lower engine RPM, so no more low amp warnings during taxi), and has a modern, solid state regulator. Finally, the GAMIjectors are just about lowering fuel burn in cruise. The generator might happen before the annual, because my generator regulator is starting to act up and there’s no point in putting more money into it.

Flight!

After fixing a last minute fuel leak on the 4th (which somehow was missed during 3 other run-ups), the Bellanca finally went for a flight on Sunday. Finally! In general, things look really good. The airplane generally flew straight and level, although it still wants to drop the right wing a little bit. When I had the plane leveled, I forgot to check that the inclinometer (ie, the ball) was centered, so I need to do that to make sure the ball is set right in flight. Then some tail rigging will be in my future.

The EDM generally performed well, although the manifold pressure reading is a bit skittish. I talked to JPI today and they say that’s a common problem with the 900 series and that there are a couple of fixes we can try. I also am having some problems with the #5 cylinder. When I’m leaning, it just cuts out entirely right around peak EGT. It shouldn’t do that and hopefully is just a dirty fuel injector (which I’ll clean on Friday). Other options are spark plugs (unlikely, since it cuts off entirely, which would suggest two plugs went bad at the same time, which would be really unlucky.

Jeff took this picture of me on a (slightly high) final to 27 after the flight. Almost looks like I know what I’m doing…

IMG_4769 - Comin in for a landing

No more painting!

The flying wires are now painted, ending the marathon of painting this year. I hate spraying enamel, largely because I suck at it. This time didn’t turn out too badly. No runs, but it’s not quite as smooth a coat as I’d like. Definitely better than it was and hopefully properly priming the flying wires will cause the enamel to actually, you know, stick this time.

I need to do a full power run-up to make sure that the fuel pressure is still adjusted properly (adding the fuel flow could theoretically reduce flow) and also adjust the generator output. Now that I have a voltmeter, I can see that the generator’s been setup a bit hot, which isn’t great for the battery. Hopefully won’t take too long, then it’s time to fly!

Primed (but not ready)…

This morning was cool enough to prime the flying wires, so now I just have to wait the 48 hours (ish) for the epoxy primer to cure and I can paint the flying wires. I must be getting better at spraying, because I managed to avoid the runs I had when I was painting some of the exterior parts for the EDM. There’s not much prep between the primer and the enamel paint, so I should be able to paint Tuesday or Wednesday night. Assuming John concurs, I should be able to go flying on the 4th :).

Straight and true?

Last weekend, I finished adjusting the flying wires and the tail feathers should now be straight and true. John inspected everything on Friday, which meant I could do the fabric repairs and paint.  Unfortunately, I let John convince me that I should repaint the flying wires while the plane’s down, so I also stripped the flying wires.  The paint won’t cure for 12 hours, so I need to wait until tomorrow morning before I can mask off the repaired sections to prime the flying wires. Tomorrow I should be able to prime the flying wires and then I can paint on the 4th.

OLYMPUS DIGITAL CAMERA

John and I had done a run-up two weeks ago and most everything looked good, although we noticed the heater muff on the exhaust was really close to the lower cowl. A new support clamp and some adjustments to the muffler and there’s more clearance now. I’m still going to have to watch it for the first couple hours, but I’m pretty happy with how it turned out. I also swung the gear with the cowl installed today and found a place where the gear rubbed on the cowl; a bit of work with the Dremel and it all looks good.

OLYMPUS DIGITAL CAMERA

The todo list before flight is pretty short: tighten the bands around the firesleeve on the fuel flow sensor and painting the flying wires. There’s a bunch of adjustments that I’ll need to make to the EDM-900 before it’s ready for a cross-country flight, but I need to make a couple short test flights first so that I can take up a safety pilot while I’m doing the adjustments.